Match Ammo Prep

Make sure you review Standard Reloading before
digging too deep here.
What is match ammo?
This is ammunition that is going to be the best we can make it. The 'best'
means the most accurate for one, specific rifle. The ammunition will be
customized to a specific rifle. It may not even chamber in another rifle, and
even if it did, shouldn't be used there. I will try to point out which steps
might make custom ammunition dangerous in a rifle other than that for which it
was customized.
A note on this sequence
In general practice, it is unlikely that you will begin your reloading process
without already having measured chamber and COAL for your rifle. On this page
they are shown within the steps to better attach them to their affected
parameters. It is also unlikely that you will incorporate all of these steps -
to do so is overkill for most shooters as well as most rifles, but as much as
possible is presented here so you can dabble and determine the point of
diminishing gains for yourself. In short, feel free to eliminate any step that
doesn't seem necessary - you can always come back to it...
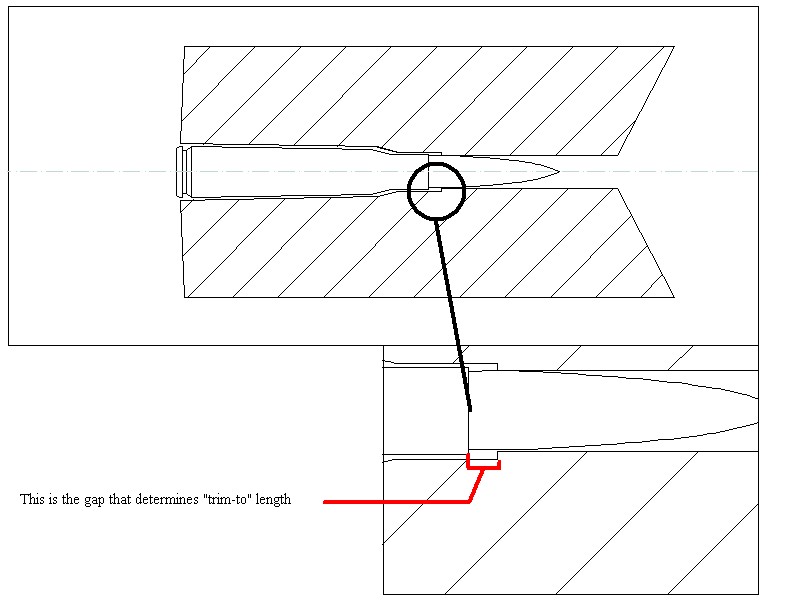
Determining trim-to length
Here's a step that could get the amateur in trouble. If you don't completely
understand this step - don't do it! You can make good ammo using the printed
specifications (found in your loading manuals) for trim-to length. Trim-to
length is some length that allows room for case 'stretch' when fired, such that
the case mouth does not stretch into contact with the 'lip' in the chamber. If
the case is too long it will contact the 'lip' and crimp down on the bullet,
possibly producing excessive (dangerous) pressures.
To find your custom "trim-to" length, the first step is determinining the
location of the 'lip':
There are a couple of ways to measure this, with a commercial gage or using
'Varmint Al's' method. ( Varmint Al's
) Search down the page for "Poor Man's Gauge". I don't know of anyone
that makes a commercial gage for the .50BMG, but if you, or a friend, have a
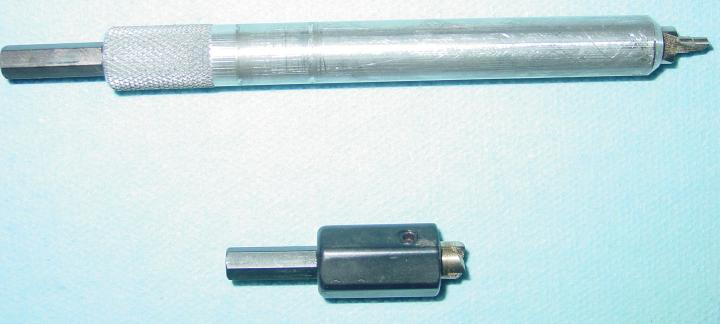
lathe you can make one pretty easily. Make it from 12L14 or similar soft steel
so it won't damage your chamber. The one in the pictures, below, is made from
Aluminum.
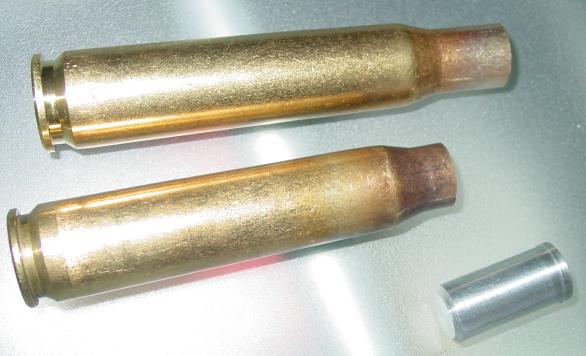
Top to bottom Standard case, cutdown case for use with gage, and
gage.
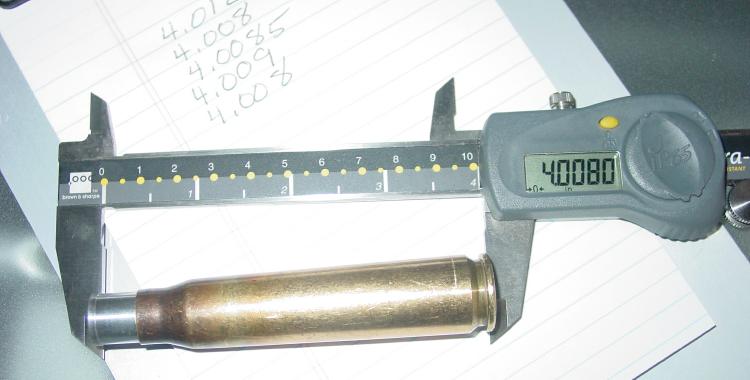
As with any critical measurement, I will make the measurement four or five
times to make sure that I am getting a repeatable measurement. A couple of
thousandths (0.002" or so) is repeatable. Once chamber depth is known, you can
adjust "trim-to" length to be sufficiently shorter, without overdoing it. I
like to err on the side of safety, so I will trim 0.010" shorter than my
chamber length. If you really want to get all you can, trim a cartridge to
nominal length, load it and fire it. Measure it after firing. The difference is
the amount of permanent stretch. Assume twice that amount as the temporary
stretch that occurs (remember, the brass will stretch, then 'snap back' during
firing) and add a couple thousandths .002" for safety.
A brief word about loading presses
There is some (though small) debate regarding which is better: a turret press, or a
single-stage press. There are advantages and disadvantages to both, and some other
alternatives...
Single stage presses are very solid and if the die holder plate is parallel to the
shellholder, and rigid, it will remain parallel. On a turret press, some 'slop' is
required to allow the turret to rotate. This is somewhat mitigated by proper setup
procedure. (Run the die down to the shellholder, then snug the lockring. - This
should serve to align the die (under pressure) to the shellholder. This will
rectify some slop, but not a lot.
Given that, you might think that a single-stage press is the hands-down winner
for accuracy, and there are certainly those that would agree with you.
The accuracy advantage of a turret press is that the dies are always set up and so
should have absolutely zero variation from one loading session to the next.
An alternative, then, is to have multiple single-stage presses. This is mostly a
matter of space, as three or four single stage presses are cheaper than a turret press
in this caliber.
Another alternative is the use of hand dies sometimes called 'arbor press
dies'. Hand dies are still a scarce item for .50 BMG, but
M2 Precision is offering
an FL sizer, and hopefully will produce a seater soon. LE Wilson is rumored to make
'anything you want' IF you provide the reamer. In case a web search turns
something up, I strongly recommend against the flake at Warner Tool Co. - I ordered a
custom die set from him over two years ago, thus far without results...
Hand dies are probably the ultimate for accuracy, because the only press parameter
that matters is whether it can supply sufficient force. The die takes care of all
alignment issues. The disadvantages are that hand tools are expensive and slow...
Alright! Let's get down to brass tacks, ...er... cases, as it where.
Cartridge selection & sorting
If you're going to spend a lot of time and energy trying to make the best
ammunition, it would behoove you to start with good cases. Silk purses, sows
ears, and such. As I write, the favored case in competition is IMI (Israeli
Military Industries) The lot I have has a headstamp of "IMI 01 *" where '01'
indicates that it was born sometime in 2001, and '*' is the NATO mark (a circle
cut into quarters). My personal next choice would be Winchester commercial,
usually headstamped "CAL 50". If I were going to try to make match ammo from
military brass I would start with a 100-120 brass for every 50 that I wanted to
end up with, and cull mercilessly. That said, let the culling begin...
Step one is to visually sort the brass - look for any kind of dings, defects,
etc. Lightly dinged case mouths will be ironed out by the sizing die, but
dented shoulders, gouges, voids, etc. are cause to discard. If you are truly
after the most accurate ammunition you can make, you will err on the side of
discarding anything questionable. One of the perqs of buying quality up front,
is you will very likely not discard much.
Note on sorting by weight: Most benchrest shooters, and other
accuracy-minded reloaders, will sort their brass by weight. Most manuals have
this as the first step. My experience is that sorting by weight is most
accurate and effective after all of the trimming etc. is done to the
case. Why throw away cases that have a big flash-hole burr, when we're going to
trim that away anyway? Once the cases are trimmed, and have uniformed
primer-pockets and flash-holes, then weighing will go a long way toward
pointing out differences that still exist.
All of my IMI brass survived this first round of culling, though there was one
that had enough of a ding on the mouth that it may be culled later, if sizing
and trimming don't iron that out.
Initial sizing
Given that you're starting out with brand new brass, some folks like to size
it, others just load it 'as - is' (new brass is usually suitably sized for
loading when acquired.) I fall into the former camp, so I will full-length size
all the brass with which I start just so I am starting from a 'known' point.
There is no difference to this step from the standard
sizing except that I remove the decapping stem from the FL sizing die.
It's fairly well documented that much case distortion is caused by expander balls.
For this reason it is preferable to use a mandrel, but I do not know of a currently
manufactured mandrel for .50 shooters. (I'm checking on that...)
Trimming to length
Trimming is the same as with plinker ammo, except that we now have a
potentially longer "trim-to" length, as previously discussed. Depending on your
chamber, you may have brass which is already shorter than required. Consistency
is the key to precision, so in this case I adjust the trimmer to just uniform
the ends and then trim the batch. At this point I note that I can no longer
tell which brass had the ding in the case mouth - an indication that there was
nothing wrong with it.
Uniforming primer pockets and flash holes
The trusty K&M tool comes out and earns it's keep some more. Same as
before. The goal is to make a nice, square bottom to the primer pocket, so that
every primer sits exactly as deep as every other. At this time I also uniform
the flash holes. K&M makes a handy flash-hole uniformer, I chuck it in a
cordless drill and go to town.
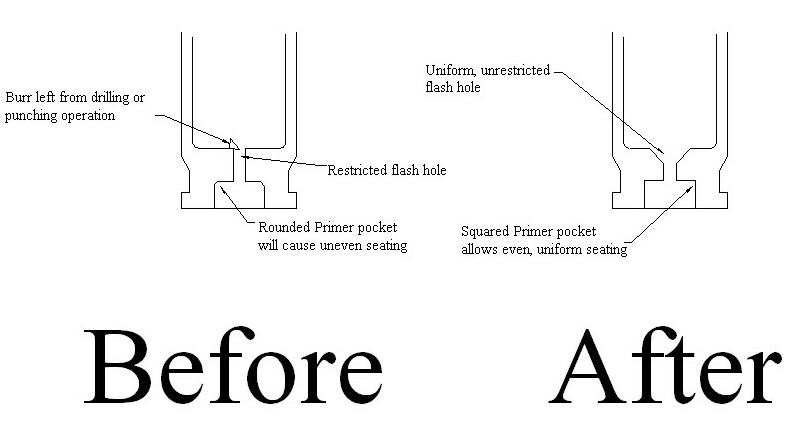
Here's a brief illustration to show what primer pocket and flash hole
uniforming does.
Here are the tools that do the job. Top is the flash hole uniformer, bottom is
primer pocket uniformer. Both of these are made by K&M. (I wish the flash
hole uniformer had a steel, rather than aluminum body, but that's just me...)
With the flash holes and primer pockets uniformed, and every case the same
length, it's now 'fair' to sort by weight. I wash the brass first to get rid of
leftover lube from sizing, as well as any brash chips left from the various
metal cutting operations.
Sorting by weight
Sorting by weight is a stop-gap technique used to sort cases when all other
methods have been exhausted. The purpose of match preparation is to make each
case as identical as possible, and as uniform as possible. (i.e. we don't want
identically defective cases, we want indentically perfect cases...) We've
trimmed the cases all to the same length, we've profiled the primer pockets and
flash holes. There's very little we can do to measure differences between cases
anymore, and even less we can do to eliminate the differences. So now we sort
by weight. In sorting, we want to determine the average weight of a case, and
see how much variation there is amongst the lot. We will discard anything that
falls very far from the 'average' as the difference would seemingly indicate
some manner of defect, or at least difference. For the statistically astute, we
want the mode (not necessarily the mean) and maybe +/- 2 standard deviations,
if the standard deviations are sufficiently tight. For those who hate
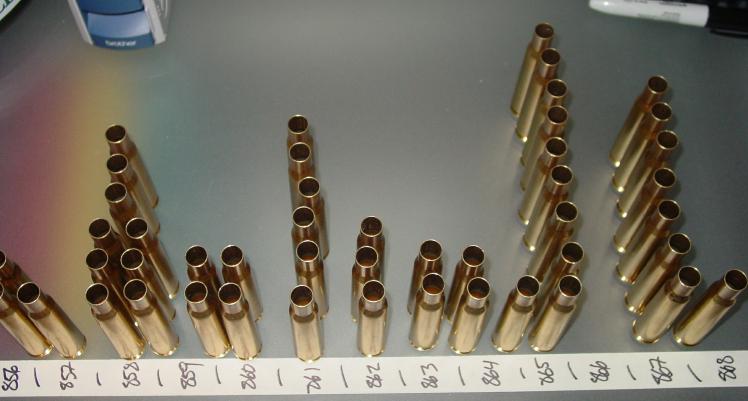
statistics (98.32% of you...) lay your cases out as shown, below, in 'bins'. I
determine 'bins' by progressively shrinking measures. Here I started by
weighing each brass and sorting to the nearest 0.2grns.
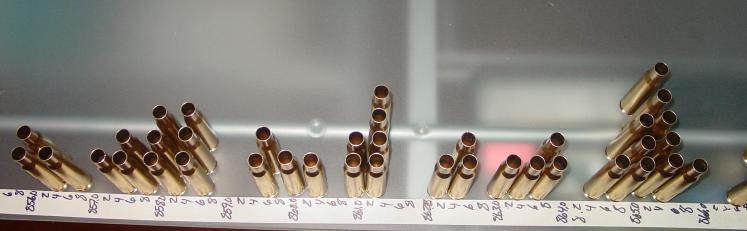
that yielded no useful pattern, so I increased the 'bin' size to 0.5 grn:
That was marginally better, but still not enough to seperate the wheat from the
chaff. Finally, I sorted by two-grain increments:
 and that yielded useful information. As you can see from the picture, the six
pieces to the left are notably lighter than the rest of the brass, indicating
somewhat significant differences. They are culled for this reason. (In this
case, I culled them by marking them with red Sharpie marker on their base. They
will not be used in a match, but for curiosity, I will test them against their
brethren in practice. (I encourage you to do this - always test your 'rejects'
against your 'perfect' ammo to verify that you are, indeed making improvements
in your loading practices.)
and that yielded useful information. As you can see from the picture, the six
pieces to the left are notably lighter than the rest of the brass, indicating
somewhat significant differences. They are culled for this reason. (In this
case, I culled them by marking them with red Sharpie marker on their base. They
will not be used in a match, but for curiosity, I will test them against their
brethren in practice. (I encourage you to do this - always test your 'rejects'
against your 'perfect' ammo to verify that you are, indeed making improvements
in your loading practices.)
Another note: the more brass you have to sort, the more meaningful your
'statistics' will turn out to be.
Neck measuring
Before I turn, I measure my case necks to check thickness and uniformity. By
measuring each case neck at four locations (think 3 o'clock, 6 o'clock, 9
o'clock, and 12 o'clock) I can tell how much variation there is in the case
thickness. I can also tell what the minimum thickness is. To get my necks at
perfectly even wall thickness, and identical throughout the batch, each neck
would need to be turned down to the thickness of that thinnest part of the
thinnest neck. In practice, I'll just turn until the thicknesses are close.
We'll discuss the setup momentarily. For the .50, neck thickness can be
measured with a caliper, micrometer, or specialized neck-thickness measuring
micrometer. I'll use the latter, because I have one, but if I were only loading
.50, I'd just use calipers.

Neck turning
There are a number of reasons to neck-turn your brass. Some benchrest rifles
are cut with extra-tight chambers and require neck turned cases, just to
chamber - I'm going to assume that if you have such a critter, you know all
about it. For those shooting 'factory' rifles, there are still some advantages
to be had. Neck turning uniforms the wall thickness. A uniform wall thickness
results in more uniform release tension, the case lets go of the bullet evenly,
directly contributing to accuracy. Uneven tension while seating bullets can
cause the bullet to cant, increasing runout. Finally uniform necks present a
uniform amount of tension for each and every case, minimizing one more
potential inconsistency.
To determine how much to neck turn, I will take four or five cases from the lot
to be prepped and set my neck turning jig to just scrape some brass off. I'll
turn all five and then examine them. What I'm looking for is a depth that cuts
about 75% of the way around the 'average' shell. It may cut all the way around
one, and barely cut at all on another, at the extremes, but for three of the
five, I want 75%. Now on this first pass it's unlikely that I got there (if I
did, I was rushing things...) so I'll adjust the cutter in ever-so-slightly and
try again. I repeat this procedure until I get the depth I want. (~75% on most
of the cases.) If you use the K&M, or another trimmer that allows you to
measure your turned thickness, you can just adjust right down to your desired
thickness. (Probably .001" more than the thinnest measurement from before,
although maybe the same as that measurement, or a thou under, there's no magic
here - go with what seems right to you, and experiment. Just remember that you
can always take more off, you can't usually put any back...
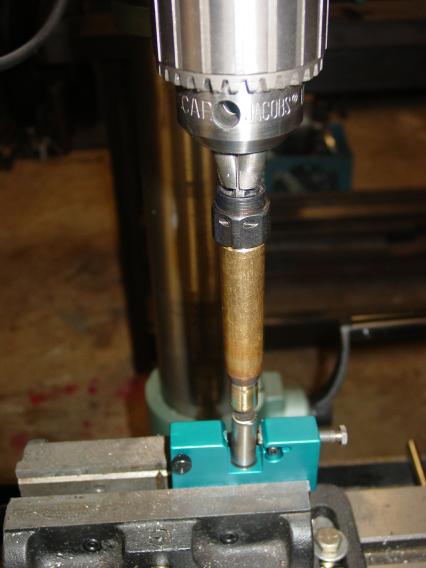
I've motorized my turning setup, by using my drill press. It works just as
well, if not quite as conveniently, by hand. Note that my drill
press has a DC motor and can be turned very slowly - I go probably 30
rpm. Note also that the trimmer isn't actually clamped in the photos,
it's 'floating' in the clamp jaws - this allows it to align naturally to the
shell.
 Here the turning isn't cleaning up quite enough...
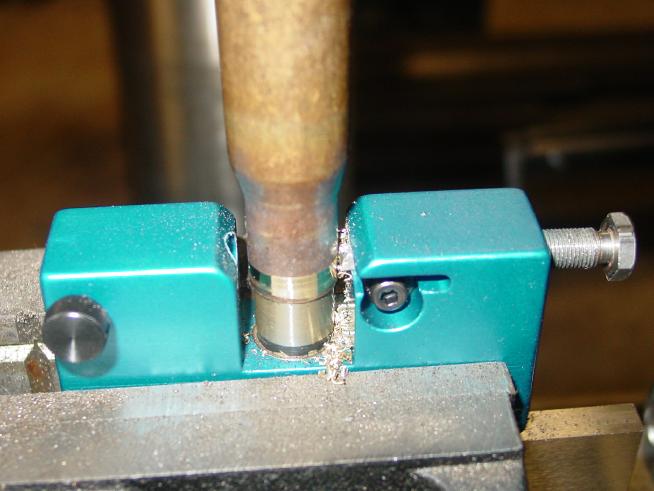 Actually cutting...
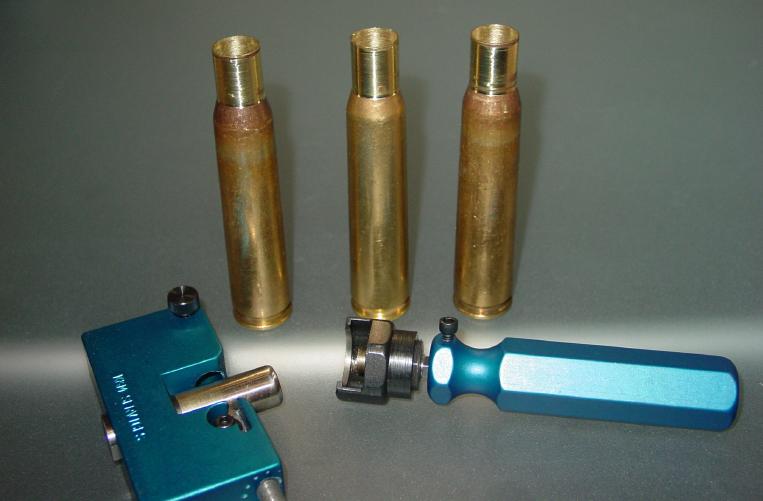 The result - nicely trimmed brass, shown with the hand-turning setup in
front.
The result - nicely trimmed brass, shown with the hand-turning setup in
front.
Priming
I prime the cases same as in the standard reloading section, using the M2
Priming system. There are a lot of similar tools on the market now.
Some shooters sort their primers by weight, using only primers that weigh
whatever they determine to be the nominal weight. I don't bother with it.
A note on what's about to happen
At this point we're still prepping the brass, and I consider the first shot
from each case to be part of that prep procedure. With 50 cases to fire before
I start labelling any of this ammunition as 'match', there's ample opportunity
to do some experimenting or load development. (Incidentally, if 'match prep'
reloading has seemed surprisingly non-magical to you, that's because the real
magic is in load development.) We'll discuss that later...
Record keeping
Record keeping is as important to accuracy as any other step. Show me someone
who consistently loads quality ammunition for their rifles, and I'll show you a
good record keeper. Record keeping lets you put together the pieces of the
puzzle as you collect data. Every reloader I know uses a different system, but
I'd suggest keeping at least the following information:
Brass Headstamp (lot # if known)
Powder, lot #, and charge weight
Trim-to length
Neck bushing used (you'll probably play with varying tension later...)
Primer used
Bullet, weight, lot #
Cartridge OAL, and how measured
How OAL was determined: are you trying to be 0.010" off the lands?
Maximum runout
Firing data: which gun, what conditions, what results
Lots of amateurs forget to come back and note firing data, some just pick one
load they liked and forget about the others. None of those folks are on their
way to consistently producing match ammunition. Keep a record of *everything*.
Charging
"Match" ammunition should be as good as you can make it, and that means
weighing out each and every powder charge. This can be a pain with the BMG,
because we're talking about a lot of powder. I set my powder thrower to throw
as close as possible, and trickle up to the correct amount. Hint: Don't set
your measure to throw 'under' or you'll be trickling 'til you're blue in the
face. Set it to throw exactly what you want, you can always 'recycle' the
throws that are a little heavy, and you'll have very little trickling to bring
the others up to weight. If you're experimenting with different charges a small
scoop is handy for adding or subtracting from the pile.
Many shooters will buy a 'lifetime supply' of a powder if they like it, just to
get the powder all from the same lot. For a match barrel in a small caliber
this might be 8-16#, but for the .50 it could get to be a very large
quantity...
Bullet-seating
Seating the bullet in the case straight is extremely important, it's also
almost entirely dependent on the seating die. Standard seating dies have a
pusher which roughly matches the bullet tip ogive, and the bullet is forced
into the case as the case is rammed into the die, with the bullet against the
stationary pusher. Typically in such a case, the bullet leans to one side and
is straightened out by the neck of the case as the bullet is seated. This isn't
really straight, however, and a great deal of runout occurs. Precision (often
called in-line) seating dies support the case and case neck and attempt to
guide the bullet into place. These dies usually have a spring loaded sleeve
that allows all of the components to be grasped and held in place before
seating pressure is applied.
Cartridge Overall length (abbreviated COAL, or OAL) is the length of the loaded
cartridge. It's also the most convenient way to express how deeply the bullet
has been seated into the case. The effects of seating depth are surprising.
Because seating depth determines how far the bullet 'jumps' before encountering
resistance, in the form of rifling, it plays a key role in determining both
pressure and velocity. Too much 'jump' can adversely affect accuracy. There are
varied ideas of how one should pick an OAL, but they all revolve around the
location of the lands that will first touch the bullet.
In practice there are three seating depth considerations:
1. Finding the maximum OAL your rifle can take
2. Measuring your cartridges repeatably
3. Determining your optimal COAL
I'll also mention what I call "magazine OAL". In many rifles, the magazine will
limit the maximum OAL you can use. If you have a magazine equipped rifle, and
want to use your magazine, make sure you determine what maximum OAL your
magazine will accomodate. (Many shooters will ignore the magazine for match
ammunition and single load their rifles. Single loading is, in fact, required
in a good many competitions.) The first two steps are the easy ones. To measure
maximum OAL, I use a Stoney Point OAL gage. The gage uses a modified cartridge
case (I think I got my case from AAA Ammo).
If you don't have a Stoney Point gage, and are at all handy, I'd suggest making
one. There's nothing special to commend the commercial unit, and it uses a
damnably fine thread for which I cannot locate a tap. (This just in: The tap size
is 5/16"-36, knowing that, you can readily order taps from MSC, J&L, KBC, etc.)
Construction details will be nearly self-evident from the photos and description.
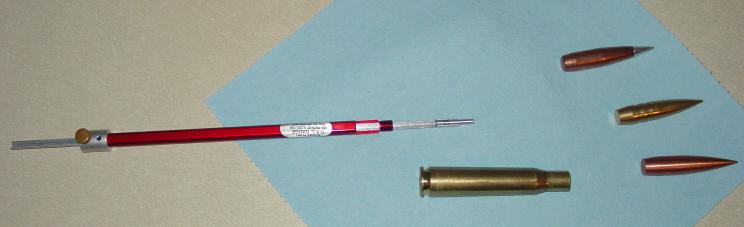
Here is the Stoney Point gage, the modified cartridge and three bullets to be
measured - remember OAL will vary with your bullet types. In fact, the Harlow
Solid is so pointed that in my rifle there was no useful maximum OAL, you can't
seat that particular bullet out too far (for MY rifle - yours may vary!).
To use the gage, the modified cartridge (the modification involves drilling
through the base, tapping it to thread onto the gage, and leaving enough of a
hole for the gage push rod to extend through.) is attached to the gage, and a
bullet, of the type to be used is set into the case neck. The case is
pushed into the chamber of the rifle, and the push rod is used to extend the
bullet forward until it will no longer advance with light pressure. The push
rod is locked in place and the device retracted. Often the bullet remains
seated in the chamber and must be knocked loose to be retrieved. This done, the
bullet is replaced in the cartridge, where it is held to the
previously-determined length by the still-locked pushrod. The length is then
measured. There are several sources of error possible in this measurement, so I
suggest repeating the measurement four or five times until you are convinced
that you are making good, repeatable, measurements. Log this number, it is the Maximum
OAL to which you may load the particular type of bullet you used in the
measurement. If you switch bullets, or wish to experiment with another,
you'll need to measure OAL again. Loading to your Max OAL places the bullet
right up against the lands, where a number of shooters insist it belongs. It
will also spike your pressure relative to a shorter OAL, so back off the powder
charge and work back up when seating against the lands.
The lands erode as the barrel wears, so repeating this measurement a few
hundred rounds from now will likely result in a longer OAL. (If it's shorter,
you need to clean your rifle better...) This is also why you want to log how
you determined OAL for your load - if you want the bullet .010" off the lands,
you may have to seat them a little longer as time goes on.
The next step is measuring the COAL repeatably. This task is greatly aided by
some type of 'comparator'. A comparator gives a relative measurement.
That is to say, the measured number is useless to you, or anyone else if you
don't have the comparator. It is only good for adjusting a cartridge relative
to your measurement. For this reason I suggest loading a dummy round and
measuring it with and without your comparator, then writing the measurements on
the dummy case itself. With that information you should be able to figure out
where you are if you should lose your comparator. One of the obstacles to
measuring OAL reliably is the degree to which the tips of some bullets can get
mashed up. This is not much of a problem for the .50BMG, so direct measurement
may suffice. A good test is to measure the length of several bullets. If the
bullets all measure identically, you should be in good shape. If the bullet
length varies, you can expect at least that much variation in your OAL without
a comparator. (If they vary, you might ask yourself why you'd consider putting
them in match ammo...)
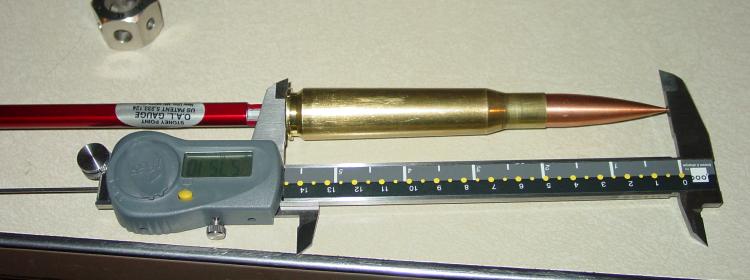
Here the OAL is being measured directly. There are several types of comparators
available, the 'nut' type shown upper left resulted in a measurement too long
for 6" calipers, so the measurement in this case is direct.
The final step is determining your optimal OAL. That can only be done from
experience and testing. Some folks set everything against the lands. I start at
nominal OAL (from the loadbook) and inch forward about .010" at a time. Once I
find the length that my rifle likes, I'll back off .010" and creep in by .002"
increments. I want the *exact* favorite length. I'll be writing on load
development later, so I'll leave it at that for now.
While we're on the subject of bullets, it should be noted that many shooters
sort their bullets by all kinds of criteria, and you can too! Try:
Weight - the obvious criteria
Concentricity - you'll need a concentricity gage
Center of mass concentricity - this is a bit esoteric, and requires special
equipment, but it's possible to determine wether the bullets center of gravity
is on-axis or not.
Fire forming
Piece-o-cake, and a fun step. Fire forming simply involves firing the loaded
cartridges in the rifle for which we're building them. Not everyone agrees with
this step, but ideally speaking you want a cartridge that 'just' fits your
chamber. Using brass that has been fired in your rifle is the closest you can
get. In practice, the fireformed brass is still undersize (it has to be to go
in easily) and grows a little with each firing. Eventually it will become
difficult to chamber, and you'll have to do some light body sizing to chamber
it again. In smaller calibers, case micrometers exist that will allow you to
measure and dimension your brass at this stage. I know of no such device for
.50 BMG, but much the same can be accomplished by setting aside a case or two
at this point. These cases can be used for setting up your FL die to size
minimally when your fired cases need it.
Cleaning and Re-sorting
The first shots have been fired, it's time to clean the cases for reloading.
There are no special steps to cleaning, just tumble and go. I sort the brass
again at this point. (See the Standard Reloading
page for detailed information about sorting.) Sorting is an on-going process,
but is especially important here, as the first firing may show up any defect in
the case that were not caught by previous screening steps. (Especially if you
didn't sort by weight.)
Neck sizing
Ahhh, the moment you've all been waiting for. Well, maybe not all of you, but
when I mention match reloading to a lot of folks I immediately get neck-sizing
questions. First, there is nothing mysterious or tricky about neck sizing. Neck
sizing allows two things:
Neck sizing allows you to preserve the tighter-than-average body dimensions of
brass fired in your chamber.
Neck sizing gives you more control over the amount of tension with which the
bullet is held.
Preserving your body dimensions allows for greater consistency, and doesn't
require much explanation. Controlling the tension that holds the bullet
warrants some discussion. First, we can control the tension by picking
different size bushings to size the neck down farther (more tension) or less
(less tension). This is an important point, because it points out a critical
fact: the size of your neck bushing is somewhat arbitrary! You need a
bushing that will size your neck down some, just to make sure that each
case grasps the bullet with equal tension. (If your bushing were too large, it
might size your most-expanded cases, but not others. Such a situation would
result in non-uniform neck tension, which results in non-uniform velocities,
which result in non-uniform groups...!) The *correct* amount of sizing
will vary with your load and your rifle, so ideally you would have a broad
array of bushings with which to experiment.
Picking your neck bushing
Lacking unlimited finances, measure your neck wall thickness (As a sanity
check, my IMI brass is about 0.0215" before trimming.) Double this number
(There are two neck wall thicknesses in a diameter.) and add the bullet
diameter. (0.510" unless you're using something exotic) This number (0.553" in
the example) is approximately the neck diameter you should measure once you
have a bullet seated. Any number smaller than this is appropriate for neck
sizing. For .50, I'd start .005" smaller than this, so a .548 bushing. If you
can swing it, buy some bigger and smaller bushings with which to experiment.
(You needn't buy them all at once. Once you start load development you'll want
to change only one parameter at a time, so you will want to do plenty of
testing before you switch bushing sizes.)
Setting up your neck sizer
The neck sizing die setup is fairly straightforward. Run the press ram to the top
of its stroke, then screw the die down to meet it. When the two touch snug up the die
lock ring. (Placing dies in this manner is good practice, as it helps align the die to the
shell holder.)
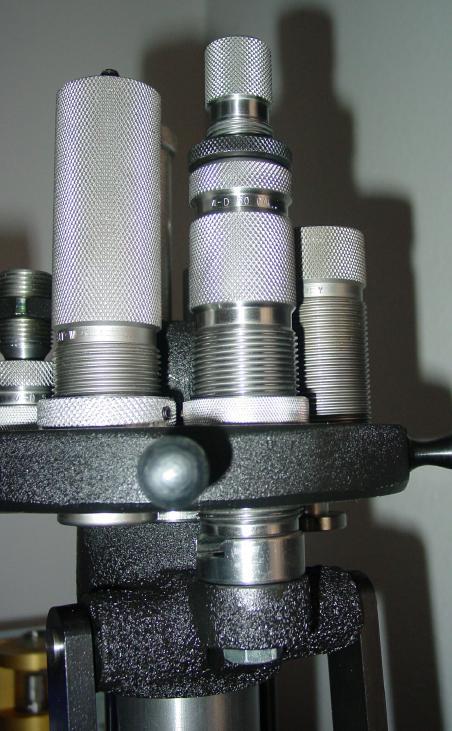 Here the neck sizing die is installed in the press.
That much is like any sizing die, but the neck sizer has an extra adjustment to adjust
how far down the neck the sizing bushing travels.
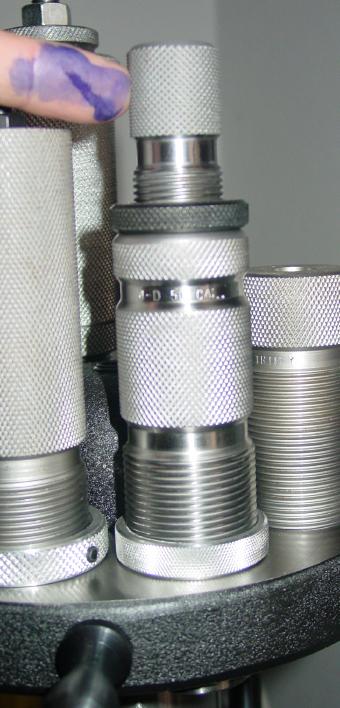 The bushing adjustment knob.
If you've replaced or removed the bushing, you had to unscrew this knob to get it out.
Tightening the bushing down increases how far down the neck is sized. Being a visually
oriented person, I like to see this, so I dye up some case necks when I'm setting up, using
layout fluid. (If you don't have layout fluid, Sharpie marker works pretty well too.)
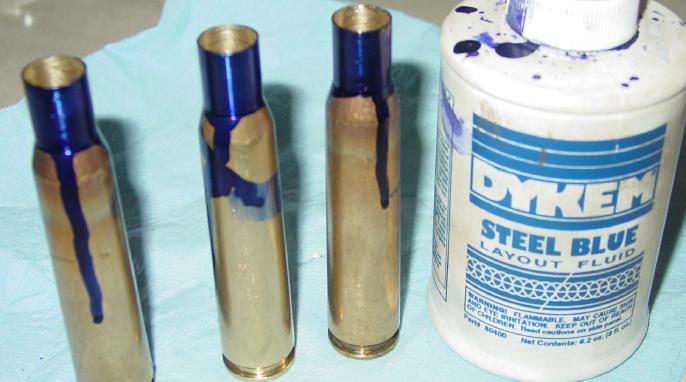 Dyed Necks
Note: this is only a setup step, I don't do this to every brass.
With the necks dyed, it's easy to see how far down the neck bushing is travelling.
 The left neck is barely being sized, the middle neck a little less than half way
and the right neck is being sized completely.
The left neck is barely being sized, the middle neck a little less than half way
and the right neck is being sized completely.
Once you are sizing as much of the neck as you want to (not everyone sizes the full neck) lock the
bushing adjust ring in place and you are good to go. (Once the lock ring is locked on, I pull the
bushing and wipe out any layout fluid that rubbed off in it. (Acetone works well, but is bad for
you...)
Trimming to length
The biggest argument I can make to buy the best (most convenient) case trimmer
is to allow you conveniently trim every brass, every time it is fired. Varied
wall thickness will cause variations in brass "growth". I like to remove these
variations after each firing. For those still reeling from the miserable
experience that trimming a bunch of length off of a bunch of brass, rest
assured it is much easier now that you are trimming .001" or less. Most
trimmers can be hooked to a cordless screwdriver, or drill press to further
ease the process. The Giraud trimmer is so easy it's not fair...
Repriming
Another step that's easier the second time, I run the primer pocket uniformer
through all the primer pockets again, this scrapes out the carbon and whatnot,
and may trim a little more brass that has "flowed" during firing.
Some folks don't like to cut the pocket more than once, and go after the primer
pockets with a brush to clean out carbon buildup. I know of no commercial brush
made for this purpose (as there are for standard rifle sizes) but sufficiently
close sizes are available at your local hardware store where they stock
Dremel/Foredom/die grinder bits.
Charging
If you're done with load development, just weigh each charge as exactly as you
care to. If you are performing load development take extreme care to keep your
differently charged cases seperate from one another, and clearly identified. If
you mis-identify the charges you're testing, all your work is in vain!
Bullet seating
There is little more to add to bullet seating. Careful measurement and
adjusting of each desired setting will contribute to greater reproduce-ability
down the road.
Measuring and sorting by runout
With all this "match" ammo loaded, there's nothing else that can be done,
right? Wrong! If you're super-serious, you can further 'cherry pick' your ammo.
Check the cartridge OAL on each round - seperate any that are shorter or longer
than the rest. (Also, try to figure out how you did that - it shouldn't
happen.) Gage the ammunition if you have a gage available. Finally, measure the
runout on each round. This requires a concentricity gage. Measure runout of the
case body, near the shoulder and runout of the seated bullet, near the
cartridge neck. You will have to establish what you want to accept and what you
don't. If only one cartridge "passes", you need to re-examine your standards,
your equipment, and/or your loading practices. The goal is to take the best
ammunition you can manufacture, and have enough of it to participate in a
match, or perform whatever shooting feat you have in mind. (Don't forget to
have extra for spotters, alibi shots, etc.)
A note on adjusting out runout
Note: All of the following is speculation on my part. I do not own, nor
have I used, any of these adjusters. What follows is my opinion, for what it's
worth. If you have a differing opinion, and can articulate your reasoning, I
will be happy to post your thoughts, with or without attribution, at your
discretion.
I see in the magazines now that there are tools for adjusting out runout. I'm very
skeptical about the efficacy of these tools. The right way to make match ammo
is to build it right the first time. If you use some specialty vise to bush a
lopsided bullet back into concentricity, something must move:
The bullet must 'slip' in the neck, resulting in a different cartridge OAL, and
possible marring of the bullet surface. Marring may not be the issue it was
once thought to be, but OAL is
critical.
The neck must bend to hold the bullet straight. This is just a transfer of the
non-concentricity. If the brass is non-concentric, but the bullet is there may
be some
improvement, but the round will never be as good as a concentrically-seated
bullet in a concentric case.
Some other part of the cartridge must bend. Same result as above.
Finally, this is the wrong 'attitude' to take for creating match ammo. Match
ammo is not about trying to salvage bad ammo (use that stuff for plinking), it
is about picking the very best, in hopes of getting the very best possible
results.