MAKEREADY
Makeready is the process of making all parts of the form print correctly.
A form of heavy and light elements mixed, even after having been leveled
in lockup, will be found to require varying degrees of impression to
print well. Dot leaders, fine type, and rules may be printing too heavily
while large type and solids are too light. Makeready selectively increases
and reduces the impression where required.
Even at the stone, heavy elements anticipated to require additional
impression can be underlaid with tissue or manifold paper, held to the back
of the form with a spot of grease; and for some jobs, this will be enough.
A dab of grease can be left on the frame of the press for this purpose.
It is possible, in the case of photopolymer plates taped to metal blocks,
to interlay the plate—that is, to use two layers of tape on heavy parts
of the plate, or to omit tape from light parts, to create a difference in
impression. But the chief method of makeready is the overlay.
The Overlay . . .
The position of the sheet having been determined, the packing is adjusted
to produce a light even impression over the whole form, so that the light
parts of the form seem to be printing more or less as they should be on
the stock intended for the job. A
rule or leader that is punching can be dealt with later.
The packing should contain a draw sheet held in place with the tympan under
the bottom bail, and a loose sheet of paper in with the other packing
as well.
The Spot Sheet
Now an impression is pulled on a piece of bond paper or somesuch. This
sheet is held in position against the packing in the guides, and stabbed
through into the packing in a couple of places with the makeready knife.
Two short horizontal
cuts along the top edge of the sheet, apart from each other, each intersected
with a vertical cut into the sheet work well. The idea is to be able to
position the bond “spot” sheet under the packing,
taped to the draw sheet
in exact register with the form. Now, those areas of the form requiring
additional impression may be pasted up on the spot sheet with pieces of
tissue or manifold. (The printer should keep an eye out for suitable thin,
hard, even papers and collect them. I have been using the paper from
corporate proxy statements. “Yes” paste, from your art supply
store works well.) Leaders and areas that are punching may be cut away in
the spot sheet or sanded down. (If cut only on three sides and folded out
of the printing area, these flaps may be folded back in place if need be.)
The stab marks are aligned and the spot sheet taped in position
to the draw sheet under the tympan; the loose sheet is removed,
so that the overall thickness of the packing is
unchanged by the addition of the spot sheet. Another impression is pulled,
and additional spotting up done if needed. Observations:
- Some pressmen use two sheets of carbonless paper under the tympan, so
that pulling an impression leaves a marked sheet in place in the
packing.
- Some pressmen pull an impression on the packing and tape over the weak
parts. This method is likely to interfere with feeding on the handfeed
and to shorten the useful life of the tympan. It does not permit of
refinements.
- A spot sheet close to the tympan will have a more specific effect on
the printing than one buried in the packing more deeply by covering it
with other packing material. Something to play with.
- I have sometimes used pieces of latex rubber dental dam under the
tympan on especially
heavy areas or areas intended to show deep impression.
- The spot, cut makeready sheet can often been saved for reuse.
Sometimes the entire packing can be stored for repeats.
- On a cylinder press, the press is stopped before the spot sheet (or
envelope) leaves the gripper, and stabbed through in position.
- Makeready and register are the duties of the press operator. To
check register, put several sheets through the press twice.
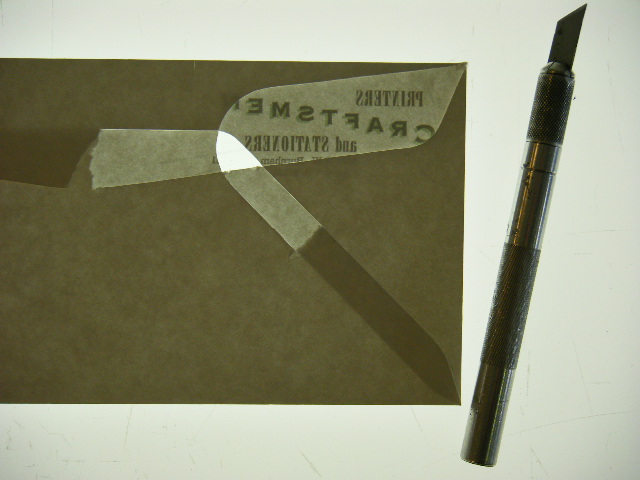
Envelope Makeready
If held to the light, an ordinary envelope will show areas of two, three,
and four layers of paper. If the printing spans different thicknesses,
an envelope makeready should be cut:
- Working as above, pull an impression on the envelope and stab through
it to be able to position it against the draw sheet beneath the tympan.
- Against a light table or window pane, working at first from the face
of the envelope, cut away entirely that small roughly triangular area
of the envelope that is four layers thick, where the front, flap, side,
and bottom panels overlap.This will scratch the glass. An art
knife may be used, but a wider, more chisel-pointed knife may be better.
The apprentice made his own makeready knife out of a piece of broken
hacksaw blade, sharpening the broken one-half-inch edge to make an
angle of about 70° with the length of the blade.
- Now, working from the back of the envelope, cut away two layers only
where three layers overlap. There are three such areas, radiating
outwards from the first cut in a sort of “Y” shape.
- Position this makeready under the tympan against the draw sheet, in
register with the job, using the stab marks. Move two or three packing
sheets from behind the draw to cover the makeready. This is done to
generalize the effect of the makeready since the envelopes will vary
somewhat in the position of their overlaps from conversion. If the
makeready has increased the thickness of the packing too much,
adjust the packing.
- When envelopes are fed to this makeready, all thicknesses will be four
layers. Where the fed envelope has four layers, the makeready has
none; where the fed envelope has three layers, the makeready has one;
where the fed envelope has two layers, so does the makeready.
- Ordinarily, the flaps of the envelopes are not opened for printing,
but sometimes it is better to open them, and to change the makeready
accordingly.
Scoring
Scoring against a die-cutting jacket, get position with a
perforating rule. Then replace it in the form with the scoring rule.
Check the squareness of a score with respect to the edge of
the sheet fed to the two bottom guides, since they can be moved to make
the score parallel or perpendicular to that edge. This means that a
score parallel to the edge is checked, not by folding on the score,
but across it, to see if the ends of the score meet when the ends of
the guide edge of the sheet are aligned. The outside of the
sheet faces the rule; the inside faces the matrix.
Home.