LOCKING UP THE FORM
- If possible, lines of type should be locked up parallel to the length
of the rollers—that is, running left to right in the chase rather
than top to bottom.
- Wood-mounted cuts should be checked in several places with a typehigh
gauge. If high, they can be sanded down against sandpaper placed on a
flat surface. If low, paper can be glued to the back to bring them up
to type-high (.918 inch).
- Forms for handfeed presses should be locked towards the bottom of the
chase. Try to make the center of the form fall below the horizontal
centerline of the chase.
If type can be locked up in a standard position, the guides on the
press will have to be moved less often. It is often easier to move
the form than to reposition the guides.
- The form should be locked with quoins on two sides. On a handfeed press,
the guides will ordinarily be at the bottom and left-hand sides of
the platen, so the quoins should be on the opposite sides of the
chase—that is, at the top and right-hand sides. In this way,
movements to adjust the position of the type in the chase can be made with
spacing material added to or removed from the “solid” sides
of the form, corresponding to the guides on the press, and differences
in the degree of expansion of the quoins do not affect the position.
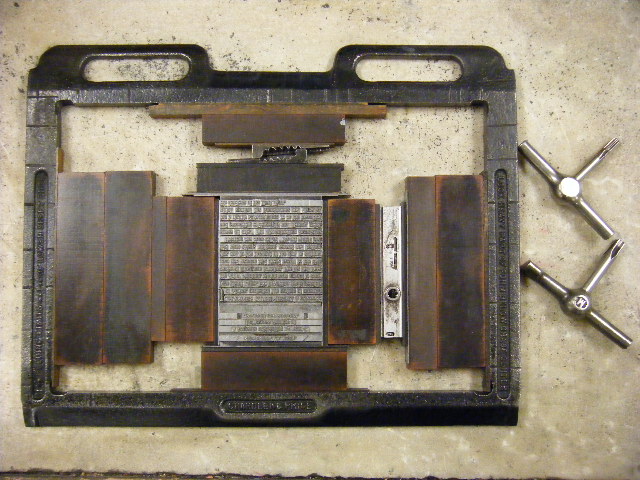
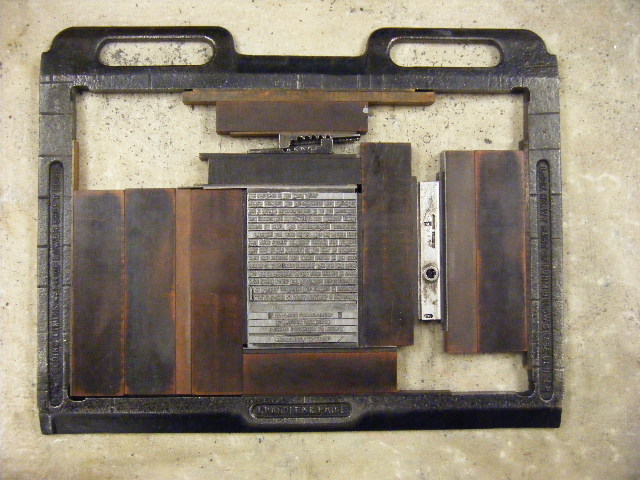 Showing the “chaser” method.
On a Heidelberg platen, which feeds to the lower right-hand corner of
the chase, the quoins should be at the top and left-hand sides.
Showing the “chaser” method.
On a Heidelberg platen, which feeds to the lower right-hand corner of
the chase, the quoins should be at the top and left-hand sides.
- When using the old “Hempel” two-part
quoins—little toothed wedges of iron, and likely marked
“Challenge” (and not the more convenient high-speed one-piece
quoins)—point the “typeside” quoin of the pair
towards the solid side of the chase, so that tightening the
quoins tends to force the type towards the solid corner of the chase.
Two or more sets of quoins may be used on the same side of the form.
- It is good to put reglets between furniture and metal surfaces to avoid
marring the furniture. (Reglets are strips of wood, six points or a pica
thick. Eighteen-point reglet is uncommon.) A rack of pre-cut reglet is
useful. Add a few leads to the furniture on each side of the form
to make small movements easier. A mix of two- and three-point leads
allows movements of one point to be made.
- The quoins should be tightened by degrees with the quoin key, a little on
either side, planing between tightenings, until the form will lift
securely. A small planer is good for platen press work—about
two inches by four. I imagine a planer could be made from a piece of
railing moulding, flat on the bottom with a piece of thick leather
attached by brads to the top. Always plane, rather than pushing down
the type with your fingers. Use the handle of the quoin key as a little
hammer. Do not slide the planer along while tapping it—lift it
between positions. The end of the planer, not its face, should be used
to plane down sharp rules. When not in use, the planer should stand on its
end on the stone so as not to pick up grit. Do not plane inked type.
The planer can be re-faced against a piece of sandpaper on a flat surface.
Make sure the furniture is tightening on the type form and not
binding on itself.
One side of the chase can be propped off the stone by the handle
of the quoin key to test the lockup by pressing with your fingers on
the type. If something gives, lay the form back on the stone, open it,
and re-justify the loose elements with brass or copper thin spaces,
one-point leads, paper, or card; tighten and try again. Test the
furniture by hitting it with the bottom of your fist.
Do not over-tighten the quoins, nor attempt thereby to fix what is really
a justification problem. Since the quoins apply force to the base of
the type, over-tightening them tends to squeeze the type upward, making
matters worse. Sometimes during printing, non-printing parts of the form may
“work-up”, become inked, and begin printing. This seems to
happen especially on cylinder presses, which exert a lateral as well as
vertical force on the type. Re-justify as above. Linotype slugs are sometimes
“bottled”—thinner at their base than at their printing
surface. “Sinkers”, thin strips of paper, dropped between the
slugs at their bases will help square them. The form should always
be well-justified and firmly locked, without over-tightening the quoins.
Sometimes a chase or furniture is out of square so that tightening
the form springs it from the stone. Remedies include replacing the worn
furniture or chase, flipping the furniture or changing the placement of
the quoins, or less pressure on the quoins. Avoid too-forceful planing.
The idea here is to level the form. So the stone itself should have
a flat level surface. For this reason, do not scar the stone by cutting
paper on it with a makeready knife or razor blade. Liquids, such as
drinks, should not be allowed to rest on metal stones because spills
or condensation can rust the stone. Many times, a stoneman has reminded
a pressman that “the stone is not a table.” Wipe the stone,
planer, and the bed of the press clean from time to time.
- If there is not enough long furniture, so that shorter pieces must
be abutted to lock up a form, the furniture should be
“laced”. If a fifty- and a thirty-pica piece have been
joined across the form, the next row should alternate with a thirty
and a fifty, and so on, alternating. Such forms, for instance for a
horizontal score, are often insecure because they are locked in
only one direction, and the furniture may not be perfectly true.
They should be tested carefully for tightness.
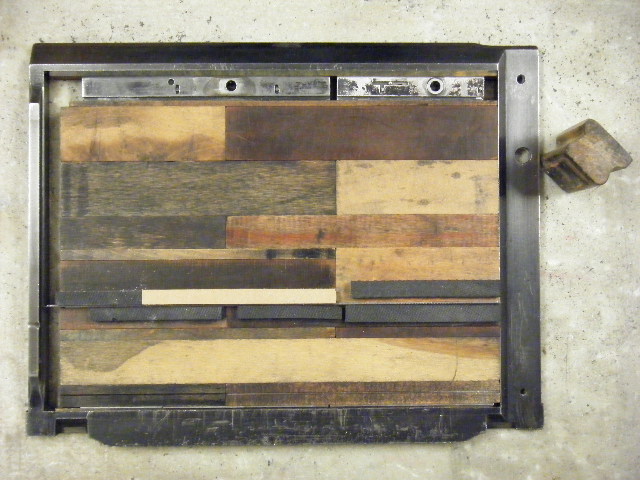 Laced and corked perforating form.
- Corking, or strips of die ejection rubber attached to the furniture
along a perforating rule will help the sheet release from the rule.
Scoring rule of .900 height seems to work best with matrix for the
average job.
- If a printed piece has two sides, consider imposing the front and
back side-by-side horizontally in the chase and printing the sheet
two-up. On the reiteration, keep the bottom guides and change over
the side guide (best) to keep register. Cut the sheets in half when
dry. This method is called “work and turn”. Its advantage
is that only one form and one makeready are needed. A
“work and roll”, also called “work and tumble”,
keeps the side guide and changes tail for head on backup: the front
and back are imposed one above the other in the chase. Register varies.
If a sheet is printed twice (or four times) on one side,
keeping the guides, and rotating the stock about an axis perpendicular
to the sheet, each half (or quarter) of the sheet has its own guides.
This is called “work and whirl”.
- Seek to think in picas and points. Measure the position of the trial
impression on the sheet and make movements without measuring in the form.
Hook the end of the pica stick over the edge of the sheet to the
guides, and draw it along to see if the lines of type are running uphill
or down against a mark on the rule. It is a good habit to use the
same pica stick—sticks vary slightly.
Home.